Payables are the amounts that a business owes to its suppliers, vendors, or creditors for the goods or services it has received. In this blog post, you will learn how to use Business Central to manage your payables efficiently, maintain a healthy cash flow, avoid late fees, and build good supplier relationships.

Payment Journals
The simplest way to pay vendors in Business Central is through a payment journal. A payment journal is like a general journal but with additional functionalities designed to help payables teams prepare payments, print cheques or send remittance advice, and insert rounding lines to balance payments in foreign currencies.
Payment journal batches
Business Central supports multiple batches for each journal type (Journal Templates in Business Central, which you can find here). My recommendation is to use more than one batch to process vendor payments. For example, you can use one batch per employee or one per each bank account.
Batches can have dedicated number sequences and reason codes. The benefit of using batches is that users can prepare journals without affecting colleagues' work. For example, I can work on payments for domestic vendors using one batch, while a colleague can work on a different batch to process payments for EU vendors. In my example, I use one batch per bank account.

Once the journal batch is open, you can key in the vendor, a payment reference and the amount, like with any other journal. Once the lines are in the journal, you can apply the payment lines to existing invoices.

A faster way to populate payment journal lines is to use the Suggest Vendor Payment action. With this action, you can let Business Central suggest the payments you should process. Let's see how it works:
Suggest Vendor Payments
You can prepare payments in Business Central using the Suggest Vendor Payments action. Open the Prepare menu and click the relevant link to open the report request page in the picture below. Click Show More on the Options tab to see all the available options.

Let's look at the options in detail:
Last Payment Date: This option filters out vendor ledger entries where the due date or payment discount date is after the date in the filter. Use this filter to include only payments due in the payment run.
Find Payment Discounts: This field allows you to include vendor invoices that are not due but for which you can get a discount if you pay early. The payment discount is calculated on the payment terms of the invoice.
Use Vendor Priority: Vendor Priority works with the Available Amount field. This field uses ranking logic in the payment journal based on the Priority field on the vendor card. Vendors with a lower priority will be excluded from the payment run if the total payable amount exceeds the Available amount.
Available Amount: The maximum amount you want to process in the payment run. A field value equal to zero, as in my example, means an unlimited amount.
Skip Exported Payments: This field allows to exclude vendor invoices for which a bank payment file exists. This option, and the next one, helps eliminate the risk of duplicating payment lines.
Check Other Journal Batches: Payment lines on other journal batches will be excluded from the payment run. I recommend leaving this field always on.
Let's leave the other options for later. Click OK to run the action, and the journal lines will populate with one line per invoice, as in my example below.
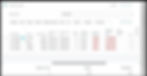
The result is a payment journal with one payment per invoice. The payments are also applied to the corresponding invoices. The next step is to post the payment.
Summarise Per Vendor, a helping hand for accounts payable.
The option Summarise Per Vendor allows you to create one journal line - therefore, one payment - per vendor.
This option is not just a tool to pull multiple invoices into one payment line. The most crucial benefit of using Suggest Per Vendor is that it helps you stay on track of your payables by returning unapplied payments or credit memos into the journal. Let's look at an example.
In the picture below, you can see a payment journal with one line for vendor 20000. Compare the image below to the payment journal above, and you can see that the total amount of the two documents is £2,995.56

The total payment is also allocated to the four invoices that show as individual lines in the previous journal. However, the difference with the second journal is the Applied Entries page, which you can open by clicking the Apply Entries action under Home.

On the page above, you can see the four invoices that made up the payment of £2,995.59 and two additional lines. These lines are positive unapplied entries. One is a payment, and one is a credit memo; both entries are open and sit on the payables ledger because they are not applied to one or more invoices.
In essence, Business Central shows me entries that could offset the amount due to this vendor before I can process a new payment run. The benefit is that I might want to revise these two entries and apply them to existing invoices before processing the payment.
Export Bank Payment files
Before posting, you can export a bank payment file from a payment journal. This option depends on the payment export setup on the bank account. Business Central comes with out-of-the-box payment export formats depending on your region. SEPA is included in the GB localisation.

To export a payment file, find the Export action under Bank.

How to troubleshoot a payment export error.
Missing details can cause a payment export to fail. When an error occurs, Business Central shows a warning similar to the one in the picture below.
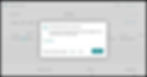
When this happens, find the I icon on the right and open the FactBox pane; the error details appear. In my example, the recipient's bank account was missing.

Some banking apps allow the transmission of the payment file to the bank. Check the app source here to find the apps that support your localisation.
Printing a Remittance Advice
Another helpful functionality of the payment journal is printing and sending vendor remittances. A simple setup is required before you can print a remittance from a payment journal: the report selection.
Search for Report Selection Purchases and open the relevant link (Or click here to open the page in Business Central). A page like the one below will open, then change the Usage filter to Vendor Remittance.

Unlike the payment export, where you can only generate a payment file before you post the payment journal, you can print a vendor remittance even after posting the journal. Hence, the two usage modes. The first is report ID 399 Vendor Remittance, used for remittance on payment journals; the second is report ID 400 Vendor Remittance - Posted Entries, which works on vendor ledger entries (Registered payments).
You can use custom layouts for these reports and an e-mail body layout. I will cover custom report layouts in a future post.
Once the report layout for vendor remittance is set, you can print or send the remittance using the action under Related and then Payments.

I have a custom report layout in my sandbox as an email body layout. Therefore, I can send my vendor a prepopulated email with the attached remittance as a PDF.

Send a Vendor Remittance from posted payments.
You can also send a vendor remittance after posting the payment. To do so, open the vendor card and find the vendor ledger entries page.

Then, select the payment line you want to send as a remittance and find the action Send Remittance Advice under Action -> Function.

Please note that the remittance generated from a vendor ledger entry is based on a different report, as I explained in the previous paragraph; therefore, you cannot use the same report layouts that run on the payment journal.
Pay invoices in bulk from a list of purchase ledgers (Vendor Ledger Entries)
Another simple method to create vendor payments in Business Central is to use the Create Payment action on the vendor ledger entries list. The accounts payable subledger (subsidiary ledger) in Business Central is called Vendor Ledger Entries. Subledgers also exist for receivables, inventory, warehouse, resources and more, which I will cover in future posts.
The vendor ledger entries page includes various actions that allow the accounts payable team to analyse entries, find overdue invoices and manage the payment application. One of these features is the Create Payment action, which allows users to select one or more invoices and create a payment journal to pay all the selected entries.

A quick way to find overdue invoices is to use the Overdue Purchase Invoice Activity on the home page.
If you click See More, you will open the vendor ledger entries page with a filter showing only overdue invoices. However, working on due invoices might not be ideal for many organisations.
My preferred way of working with the payables subledger in Business Central is to use a dynamic filter on the Due Date field so it shows invoices due one week from my working date. To do that, I use this formula: ..T+1W. The formula finds today's date, adds one week and returns invoices with a due up until the calculated date. The result is a list of overdue invoices and documents due in one week.

Pages like this can be saved and shared to a Teams channel, which is a great way to facilitate collaboration.
How to apply a vendor payment to one or multiple invoices after posting the journal.
Sometimes, users must process vendor payments and process the application later. In this case, Business Central allows posting a payment application from the vendor ledger entries.
To do that, select the payment line you want to apply and choose Apply Entries.

The application of vendor ledger entries also works for credit memos and refunds, and it supports multiple applications per entry. For example, a payment can be applied to multiple invoices and credit memos.
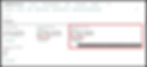
The application page opens after clicking on Apply Entries, showing open entries that can be applied. In my example, I have a payment for £922.55 that I apply to an invoice and a credit memo.

The applied amount of -£870.00 is the sum of the two documents' balances, which results in a positive balance of £52.56 after the payment application.
In Conclusion
Business Central offers various features and functionalities to help you manage your payables efficiently and effectively. You can use payment journals, suggest vendor payments, export bank payment files, print or send remittance advice, and apply payments to invoices or credit memos.
You can also create payments from a list of vendor ledger entries and filter them by due date or other criteria. Using these tools, you can maintain a healthy cash flow, avoid late fees, and build good supplier relationships.
Regards
Alfredo Iorio
Do you want to train with us?
Click below to check our training programs.
